

Vol-060 Faux Burl Wood Cane Polymer Clay Pens Veneers Slabs Beads Jewelry
INTRO VIDEO
Quality Pen Kits That Are Easy To Assemble Even Without A Pen Press
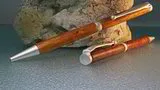
In this 6 part video tutorial series, you will learn techniques and tricks that will have you creating stunning, unique and professional looking Faux Burl Wood Pens as well as jewelry and other great looking polymer clay projects.
Your faux burl wood tutorial has been good for me!!! It's so easy to follow and gives such beautiful results, I am amazed that I can do this!!! I find it so motivating seeing the results. I am thoroughly enjoying your method and all the help and confidence your tutorial has given me. I've been playing all day!!! Thanks heaps.
~Jo-M
I made several unique and colourful pens for Christmas presents. They were a real hit! I managed to keep one for myself, but I plan to make more too. Recommended video purchases from Cindy... that's for sure! :D
~Michelle-C
Hi Cindy, I just discovered this tutorial. I love it! My daughter and I were just discussing how encouraging you are on your videos. Thank you so much.
~Marilyn-S
I am a woodworker and I have made quite a few wooden pens and other turned items. I became interested polymer clay and in your videos when you did this series on the making polymer clay pens. I now have a lot more flexibility with color and design than I had with wood. Very much appreciated!
~Mike-T
Love, love, love the look of this faux Burl Wood cane. I covered some cheap pens ages ago... was not satisfied with them, so I did not sell them. But now, the "Cindy Way" looks beautiful, and I know the male members of my large extended family will treasure them. Gifts for guys... a big thanks Cindy!
~Elaine-F
Hi Cindy, I used the Faux Burlwood tutorial to make a bunch of crosses that will be given to each person being baptized this weekend at a local church. They turned out great and the baptism coordinator loved them! Thanks for the tutorial. I love the PCT community!
~Michele-H
I am so excited about this tutorial since, not only does Cindy link us to a really nice inexpensive pen blank, we also get to learn a whole new cane technique plus an additional benefit of jewelry ideas.
~DixieAnn-S
Ah, Cindy, I love this tutorial! You made it so easy, and there are so many creative options when veneering polyclay to the pen tubes. I just tried it with pinks and browns, and added a slight amount of tiny chopped translucent. Wow, the burls are totally 3D! I'm giving this pen to my Godmother for Mothers Day.
~Jocelyn-C
You have outdone yourself! What a wonderfully comprehensive tute! So many others cover pens, but not this professionally! I have wanted to cover pens for so long, but was never happy with how they looked. Now I can! Love the Burl wood look, but my mind is in a whirl with other ideas too... I CAN'T SLEEP... LOL.
~Patt-W
I love this technique... it's MUCH more interesting than ordinary faux wood.
~Sue-F
Cindy - Your videos are the best I've ever seen! I definitely will point anyone interested in learning how to create with clay to your site. Thanks for your time and your great teaching ability!
~Carol-O
Hi Cindy, I made 5 of these pens and have given 2 of them as gifts. One was for a good friend and the other for my great niece's graduation. They both loved them. Thank you for what you share with all of us.
~Vivian-B
Thank you very much Cindy. I love your tutorials! You have great energy and I’ve learned a lot with your free ones. Now I'm even more happy to support you with these more in depth paid videos.
~Lynn-V
I've been messing around with PC for years, but am constantly amazed at how Cindy manages to add new ideas to even basic subjects. I am so delighted to be part of this Polymer Clay Tutor family.
~Marion-R
I am new to the Cindy’s paid “class room” and really don’t know what took me so long. It seems nearly every online search turns up a Cindy Lietz YouTube video! So thankful I am finally here. It has made such a difference in the quality of my work. More often than not... now, I like what I make and make what I like!
~Terri-J
I wanted to do some pens, and was delighted to see this faux burl wood pen tutorial series... the pc covered Bic pens are not even in the same galaxy as these beautiful pens Cindy shows us how to do. I also wanted to say how I love this family of clayers... so kind and thoughtful. I am genuinely thankful to find you all.
~Terrie-J
Just ordered my pen kits. Great tutorial! Thanks Cindy!
~Elizabeth-S
I'm constantly scribbling notes with my pens. Now I can have an attractive accessory at every workstation!
~Monique-U
Gorgeous technique!
~Jill-V
The cane in this tutorial and all the possibilities is just awesome! Tinting with different colors... adding a hint of mica powders... I love playing with clay. I am sure this is just what you had in mind for us, Cindy, to use our minds. I can't tell you how excited I am, at the timing for this tutorial. Thank you so much!
~Peggy-B
Yep! This is cool!! I didn't realize how inexpensive the kits were! Now to play!!
~Catalina-L
Cat, I didn't realize the kits were so inexpensive either. Cindy you have answered all my questions about making pens that are not just the simple Bic design. I have covered many Bic pens, and everyone has enjoyed them, but there is a definite need for this when it comes to covering a pen for a lovely graduation gift.
~Peggy-B
This tutorial has a special place in my heart, as I am making a very special beautiful pen gift for my Grandson's graduation. Thank you Cindy and Doug. Once again you have hit it way out of the ball park and into my heart. Many, many Uuuuuugggggs.
~Peggy-B
I love all types of wood, but now with these faux wood polymer clay pen sets, I will not feel guilty anymore, when another tree crashes to the ground for arts sake. Cheers.
~Elaine-F
Awesome as usual.
~Teresa-D
Cindy, these little jewels will sell like hotcakes... thanks so much for branching out. Almost want to put one of those ball chains on them like the bank, so it never leaves my side, lol!
~Jocelyn-C
I received some bad news yesterday as I was diagnosed with bone marrow and blood cancer. There is no cure but it can be controlled with chemo pills, and monthly blood transfusions. At least there is no pain with this per say. Thanks Cindy for your great pen tuts. They keep me going everyday.
~Elly-M
I like the idea of covering this type of pen that you can refill and keep using.
~Michelle-A
Thank You. So happy to have found you and joined in on the fun!
~Linda-O
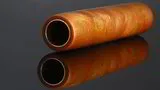
Just watched the videos on the faux wood pens. You are so talented. My grandson uses a lathe for turning wood into pens. He's 12. From the videos -- your pens look so much like real wood. Thanks for sharing. Keep up the good work.
~Sara-T
Thought I'd try the Faux Burl Wood technique on its own first, to get a feel for how it behaved in specific projects. I followed Cindy's instructions pretty closely. With the convoluted grain of burl wood in mind, I made a twisty pendant and a pair of earring dangles to match... another fantastic technique, Cindy!
~Sue-F
Pt-1: A $1000 FUNDARAISER: Cindy, This is a lengthy story, but I wanted to thank you particularly for this Burlwood Pen tutorial. You have helped me to raise over a thousand dollars in a fundraiser. BACK STORY: I initially fell in love with the Burlwood Pen project after making one for my husband's birthday. He LOVED it!
~Chrissy-W
Pt-2: It took my husband a while to convince me that it wasn’t just husbandly-duty speaking, and that he actually DID really LOVE that pen. He carries it everywhere and uses it constantly... even had a difficult time coping one day in a meeting, when he accidentally left his burl wood pen in his car before work.
~Chrissy-W
Pt-3 Shortly after, he wanted me to make one for his best friend in the colors of his favorite sports team. I tried to work out how to do it in a way that would look nice and after several failed attempts, decided to use the same cane method as the Burlwood, but in the team colors. It turned out fantastic!
~Chrissy-W
Pt-4: His friend called me directly and thanked me profusely... saying how much he loved the pen. When we found out that our daughter’s soccer team would be attending an international soccer tournament in England, we all brainstormed on how to help raise money for the trip, since it is going to cost a TON!
~Chrissy-W
Pt-5: My husband suggested that I make and sell these pens, offering a choice of clay colors and a variety of hardware finishes. I was a little leery since it would mean there was a high potential for me spending the next several months calling in sick, so I could spend all day making pens. But we went ahead and did it.
~Chrissy-W
Pt-6: I made samples, produced a brochure, and my husband took it from there. He immediately sold several to guys at his company, and I sold some at my work, and my mom at hers. In an effort to cut this story a little shorter, let’s just say that since it started, we have sold quite a few pens and made over $1000 so far.
~Chrissy-W
Pt-7: Most people wanted me to match their favorite sports teams, or their child’s University or High School colors. And the most popular pattern was the swirl, which is what I simplified the burlwood pattern name to on the order form, though I have sold a ton of light and dark burlwood as well.
~Chrissy-W
Pt-8: I did some of my own flower patterns as well... for “girly” options. Besides the burlwood pattern, I also used your leopard pattern (that was a very big hit with my daughter). And the scrap clay pen was my mother’s idea. She actually sold that one… we called it Kaleidoscope.
~Chrissy-W
Pt-9: Anyway, as I said, I just wanted to share what I have done with your tutorial. Thanks again for all of the tutorials you have created, that allowed fundraising effort to happen.
~Chrissy-W
I LOVE this fundraising story and LOVE these pens!!!! Talk about taking a Cindy tute and running with it, right?
~Elisabeth-S
Tools Supplies
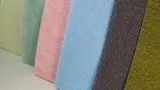
- Polymer Clay in the Following Colors (I used... Premo Alizarin Crimson, Ecru, Burnt Umber, 18K Gold, Copper, Bronze, Antique Gold, Gold, Pearl)
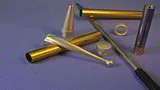
- Pen Blanks from Penn State Industries
- Old Gift Card
- Clay Blade
- Pasta Machine or Acrylic Roller
- Oven Thermometer
- Baking Pan Lined with Cardstock with Foil Pan Lid
- Renaissance Wax
- Bowl of Soapy Water
- Wet Dry Sandpaper (I used... 220g, 400g, 600g, 1000g)
- Cloth for wax
- Rubbing Alcohol
- Paper Towel
- Bead Rack and Pins
- Nylon Hammer and Scrap Wood or Nylon (Or Pen Press)
Nice To Have Items
- Playing Cards
- Acrylic Brayer
- Ruler
- Playing Cards
- Acrylic Block or Sheet
- Chopstick
- Pen Press (I didn't demo but it makes pen assembly easier)
Resource links to products listed above, will be included when you buy this tutorial.