Log In
Log In

Vol-067 Faux Enamel And Viking Knit Wire Bracelet Handmade Clasp Jewelry

- +
Add To Cart
Sold Out

INTRO VIDEO

Making A Bracelet Is The Focus Of This Tutorial Series... But Don't Stop There

<iframe src="https://player.vimeo.com/video/93204566?app_id=122963" width="480" height="270" frameborder="0" allow="autoplay; fullscreen" allowfullscreen></iframe>

In this 6 part video tutorial series, you will learn how to create a versatile faux enamel polymer clay technique using stencils and liquid polymer clay. You will also learn how to do the ancient wire chain making art of Viking Knit. The ideas and techniques can not only be used for the projects I demonstrate in this tutorial series, but also for other home decor and jewelry projects as well.

You hit it out of the ball park, Cindy! This is a tool that I never thought would interest me. But I have this beautiful necklace that really needs a copper chain or something to highlight it, and voila! The Mad Scientist / Polymer Clay Guru strikes again! Many thanks for your ideas that keep me inspired.


~Marianne-O


I just got my first bracelet made. Thank you, Cindy! Your instructions made it so easy to make. I love it!


~Marianne-O


Cindy, only you could get me this excited about learning the Viking Knit. I had absolutely no interest before, because it looked too complicated, as I had watched a video on YouTube and got thoroughly confused. Oh my gosh have you made it easy! Your step by step close up shots just blew me away.


~DixieAnn-S


Cindy, I had often seen Viking Knit taught at bead shows, but this, by far, is the clearest tutorial ever. Thank you so much… yum!


~Marilyn-P


Cindy Lietz makes the 'scary' part SO Easy. She breaks down each little step, and her husband Doug is great at all the close ups so we don't miss anything. Video tutorials are great! Love that pause button ;) -- thank you guys.


~Sherry-L


Thanks, Cindy. A great way for me to use up all the Viking knit pieces that I have made! You make it so much easier than I thought it would be! Hugs.


~Nettonya-R


Sitting in the Jury Room this morning, with Viking Knit tool in hand, waiting to see if I would be impaneled on my 4th jury. Had people around me ask "what is that?" Showed them a sample of finished knit and got Ooos and Ahhhs. Then I turned on my iPhone to check Cindy's site. Who said there are no coincidences? :-)


~Bertha-A


I love the idea of the magnetic clasps and the hooks.


~Bertha-A


Still enjoying your videos! Even though I've been working with polymer clay for almost 15 years now, it seems like there is always something else to learn. Thank you for your time and talent!


~Gayle-T


Love the faux enameling technique!


~Jocelyn-C


Wow... this video is great! My friend has been doing Viking Knit jewelry for awhile. It looked so complicated, but you make it so easy. My friend, Ani, placed beads inside the Viking Knit coil before she finished it off. Can you imagine how beautiful that would be with our polymer clay accent beads!


~Natalie-H


Cindy this tute is wonderful. Your instructions for the viking knit is much more in depth than what you would find on YouTube.


~Sandra-J


Honestly, I think I have bought MOST of the tools/products needed to complete every project you have done a tutorial on for two years now. You make these projects so EASY for us. And if I need to stop to go somewhere, I can just hit play when I return to continue my personal lesson, as if you were sitting right next to me.


~Kelli-N


Ohhhh… doing a happy dance.


~Sandra-J


I really like this one. Thank you Cindy for all the great projects.


~Sherry-C


Have wanted to learn this from way back when I bought the draw plate. A BIG THANKS Cindy.


~Elaine-F


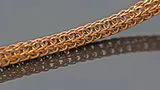
I have made 4 viking knit chains, one out of single 28 gauge wire, too soft I found, one out of double 28 gauge, a little bit better, one using 26 and one using 22. I am now using 24 which is by far the nicest. It doesn’t get stuck or kink. This is such a great technique. I “knit” while watching tv, stops me from snacking :)


~Sandra-J


This is such a wonderful tutorial. Just had to let you know that I am loving the viking knit. It is very relaxing and fun once you get the hang of it. Thanks for the fun.


~Karonkay-C


Thank you so much for this wonderful tutorial. It certainly was a lot of bang for my buck! Because of your skilled teaching and the ease of learning your tutorials, I have been commissioned to create several necklaces and bracelets that will be gifts to women in China early next year!


~DixieAnn-S


I'm loving the viking knit… I can see it fast becoming a favorite! Thanks for introducing us to such a cool technique, Cindy!


~Betty-B


Thanks for another great tute Cindy! Have now been working all week on my viking knit and my pendants. Having fun.


~Jan-W


Hi Cindy, wow, this tutorial is amazing as always. I just made a piece with a rose on it using liquid Polyclay, alcohol inks, and some embossing powder.


~Michelle-A


This was a really great tutorial. Thank you for sharing this with us all. It sure makes you think about all the different projects you can start after watching it.


~Suzanne-H


I used a metal stencil, and as long as you wet it first, it works fine. Made two particle ones and they came out great!


~Natalie-H


Thank you, Cindy! Every tutorial I watch, I say, wow, she's good! So helpful and thorough!


~Fran-C


Wow Cindy - talk about getting a 'bang for your buck' !! YES! So happy that you are covering this technique **happyhappyhappy... :)


~Sherry-L


Cindy, thank you for ALL the great info, tips, tricks and test that you spend you so much time on... to bring us the most up to date and correct info about polymer clay and mixed media creating!


~Kelli-N


Cindy, you made my Christmas, feverishly working on viking knit, went through 15 yds of wire already, and still going!


~DixieAnn-S


LOL Dixie Ann I have gone thru about that same amount of wire too! I never thought I would enjoy doing Viking Knit, BUT I very much do enjoy it, THANK YOU Cindy for the GREAT TUTE!!!!


~Kelli-N


It's been awhile since I've posted, although I do keep up with the tutorials. Unfortunately, my chronic pain and other stuff keep me from being as active as I would like. I miss all my "Cindy friends!" This site just keeps getting better! I feel so proud of Cindy and Doug... they've made the PCT brand awesome as ever!


~Phaedrakat


Thank you Cindy... your stuff is fantastic! And you thoroughly explain things... The best kind of teacher :)


~Alison-C


Thanks and keep up the good work! Love, love, LOVE the videos!


~Shawn-W


Yes I have learned so much from your videos. I know they take a lot of work for you to make them for us, so thank you for educating all of us.


~Sherry-W


Tools Supplies

  • Polymer Clay in Color of your Choice (I used Premo White and Black)
  • Clay Blade
  • Pasta Machine or Acrylic Roller
  • Oven Thermometer
  • Baking Pan Lined with Cardstock with Foil Pan Lid
  • Stencils
  • Liquid Polymer Clay
  • Chalk Pastels
  • PearlEx Powders
  • Hand Held Drill (Pin Vise) and Bits
  • Flush Cutters
  • Chain Nose Jewelry Pliers
  • Round Nose Jewelry Pliers
  • 20g Half Hard Wire in Metal of your Choice
  • 24g Dead Soft Wire in Metal of your Choice
  • Lazee Daizee Viking Knit Wire Weaving Tool or 1/4 Inch Wooden Dowel
  • Draw Plate


Nice To Have Items


  • Cardboard Tube
  • Palette Knife
  • Glass Mat or Non-stick Worksurface
  • Acrylic Brayer
  • Renaissance Wax
  • Wet Dry Sandpaper (I used... 220g, 400g, 600g, 1000g)
  • Shape Cutters
  • Cord Ends or Bead Cones
  • Clasp Magnetic or Hook Clasp
  • Paper Towel
  • Office Paper and Tape
  • Heat Gun
  • Jump Rings
  • Soft Cloth
  • 6-Step Bail Making Pliers
  • Vise
  • Nylon Jaw Pliers
  • Accent Beads

Resource links to products listed above, will be included when you buy this tutorial.

Related products


14720 - 60 Avenue, Surrey, BC, Canada, V3S-1R7 • 360-746-2093 • Copyright © 2007-2021 All Rights Reserved

Your cart is empty Continue
Shopping Cart
Subtotal:
Discount 
Discount 
View Details
- +
Sold Out